


Entertaining Kids With Christmas Crafts
Everyone remembers how difficult it was as a kid to be patient during the weeks before Christmas. There was just too much excitement about presents and candy and having fun with friends; well what was a kid to do? Here are some quick and easy craft ideas to help you entertain your kids during the pre-Christmas season this year.
Christmas Cards:

Instead of spending a lot of money buying commercial Christmas cards in the store, how about having your kids make Christmas cards to send out to family and friends? Cards are easy to make and can be done using craft material you can find around your home or purchase inexpensively in a local craft store. Here are some card ideas to get you started:
Photo Christmas Cards: use photos you already have or take some specifically for the cards. These are great for grandparents, aunts and uncles because they love seeing updated pictures of the kids. Use card stock or construction paper for the card and cut out a rectangle, square, or circle in the middle of the front of the card. Lay a favorite photo of the kids on the inside over the cutout so that the photo shows through on the front of the card. Decorate the card with holiday stickers and crayon drawings from the kids and you have a winning card that anyone would treasure. Make sure you remember to place a poem or short holiday greeting on the inside of the card.
Treat Cards:
Use cardstock or construction paper to make the card and then find some winter scenes from an old magazine. Paste or glue the scenes on the front of the card. On the inside of the card tape an envelope of hot chocolate drink mix, dry soup mix envelope or a tea bag to the inside of the card. Write a warm greeting and place some XXX000 and the child's name.
Wreaths are special at Christmas time because they celebrate the circle of friendship. Make this season special around your home by decorating the doors with special holiday wreaths.
Wreaths:
Cereal Wreath
Take a white paper plate and have the kids paint with green non-toxic paint all around the outer edge of the plate (if no edge have them paint like an inch or two in). Once the plate is dry have them cut out the inner circle of the plate.
Have on hand colored cereal in different shapes. Glue the cereal pieces to the green part of the plate. Now attach a big red bow to the bottom of the plate and you have a beautiful handmade cereal wreath to display on one of your doors.
Card Wreath
Take a large piece of cardboard and draw a circle. Now cut out the circle and draw another circle in the middle so that you leave at least 6" all around the outside of the circle. This is your wreath. Now go get all those old Christmas cards you have stashed away in the attic from last year, and the year before, and the year before that. Have the kids go through this pile of old Christmas cards and pick out their favorites. Line them up so they encircle the wreath side by side. You can overlap the cards for a great affect. Now glue the card backs to the wreath where you want them until the entire wreath is covered with Christmas cards. Attach a holiday bow and you have a fantastic wreath for your home.
What better way to remember what your child wants for Christmas then to make a Christmas Wish List Tablecloth? They are fun for the kids to make and very useful for Santa when it comes to making those special gifts appear.
Christmas Wish List Tablecloth:
Purchase a white plastic tablecloth at the store and make sure you have plenty of non-toxic markers on hand. Place the cloth on the table or floor and give the kids the markers. Tell them to draw pictures of what they want for Christmas or if they are older have them actually write out their list (in great detail), this should keep them busy for a while and you will end up with a Christmas craft you will treasure for years.
Perfect Holiday Guide Related Articles

Christmas Craft Gift Ideas For The Young And The Young At Heart
The holidays are special times when family and friends gather to celebrate with food, fun, presents and good cheer. Make your home festive with these colorful holiday crafts.
There are many types of crafts from paper projects to yarn, tile, paint, clay and any number of other mediums. Take a stroll through your local craft supply store for some good inspiration. Crafts can be done to decorate the home, use as gifts or to keep hands busy.

Here two fun Christmas crafts to try:
Craft Gifts: Artwork Magnet - Everyone loves magnets!
Supplies:
3 Clothespins (the spring kind)
Glue
Magnet Strip
Paint
Paint Stir Stick
What to do:
Step #1 - Paint the paint stir stick any color you wish.
Step #2 - Paint the 3 clothespins a matching color or a contrasting color.
Step #3 - Wait for the paint to dry
Step #4 - Glue the 3 clothespins onto the stir stick ( one in the middle, one about 2" from each end).
Step #5 - Paint to decorate or use a marker to decorate. You can also write a message on the remaining sections of stick.
Step #6 - Attach the magnet strip to the back of the paint stir stick.
Step #7 – Wrap in holiday gift wrap and tie with ribbons and bows.
Christmas Cookie Jar:

These are big hits with all cookie lovers and are super easy and fun to make and decorate.
Supplies you will need:
Mason Jars for the number of gifts you are making (Quart size canning jars with lids)
Scrap Fabric in Christmas colors and patterns
Christmas Ribbon
Paper (to write the recipe on)
Glue
The recipe and the required ingredients
Jar:
Step #1 - Make sure you carefully wash the jar and lid (even ones you just bought), then make sure you throughly dry the jar and lid.
Step #2 - Pick your favorite recipe
Filling the jar
Step #1 - Gather together all of the dry ingredients for the recipe.
Step #2 - Make sure you measure the ingredients accurately (small kids will need help with this).
Step #3 - Add each ingredient carefully to the jar.
Step #4 - Decorate the Jar with Christmas fabric and ribbons. Don't forget to decorate the lid by cutting out a circle of the fabric that is 6 - 8" across (trace a bowl if it is easier).
Step #5 - Next, place the round section of the jar's lid on the jar and center the fabric on that.
Step #6 - Screw the other section of the lid in place to hold the fabric.
Step #7 - Fluff out the ends of the fabric that sticks out from under the lid.
Step #8 - Print out the recipe on a card/gift tag or index card
Step #9 - Punch a hole in the recipe card/gift tag or index card so that you can tie a ribbon through it.
Step #10 - Attach the ribbon and recipe tag to the neck of the jar.
Step #11 - You can secure the ribbon with a small dab of glue
This gift is great because it is its own gift wrapping!
Perfect Holiday Guide Related Articles

Homemade Christmas Tree Ornaments
A fun family project during the holidays is to make your own Christmas tree ornaments. Here are some easy crafts that will soon have you making your very own ornaments.

Pinecone Ornaments
Supplies:
- Pine Cones
- Paint
- Beads, glitter or sequins, yarn and small buttons to decorate with
- Ribbon
- Glue
What to do:
- Cut a 6" length of ribbon.
- Tie into a circle and glue the tied part to the pointy tip of the pine cone.
- Paint the cone green
- While the paint is still wet sprinkle with the glitter.
- Once the paint is dry you can decorate with beads and sequins to look like ornaments on the tree.
- You can paint the tips white to look like snow.
- You can hang on your Christmas tree as an ornament or you can place it on a shelf by putting it into a small clay decorated pot.
Ice Cream Cone Ornament
These are fun to make and anyone over 3 yrs of age can make these.
Supplies you will need:
- Either the cake or the sugar ice cream cones
- A solid colored ball ornament big enough to sit on the cones
- White acrylic pain
- Tiny glass beads
- Glue or hot glue
- Spray acrylic
- Ribbon
What to do:
- Hold the cone by the base
- Place glue all along the inside rim of the cone.
- Place the ball ornament on the cone with the hanging side up
- Make sure the ornament is dry before doing the next part. (hot glue works faster).
- Drizzle white paint on top of the ball
- Sprinkle glass beads on top of the wet white paint.
Let this dry overnight
Lightly spray the cone part with acrylic. DO NOT GET TOO CLOSE TO THE CONE WHILE SPRAYING as this may melt the cone. This will seal the cone.
Tie a colorful ribbon through the loop of the ornament
Your ornament is done.
****NOTE*****
if you want to write the child's name and date on the base of the cone before spraying with acrylic it is a nice touch.
Balloon Tree Ornament
You will need:
Balloons that are small and round
- Liquid Starch
- Newspaper cut into little pieces
- Corn seeds
- Glue
- Gold paint
- Matches
- Lace
- Pin
What to do:
- Blow up the balloons until they are the size to fit into the palm of your hand.
- Smear the starch all over the balloon (you can use paper mache if you want)
- Put the pieces of newspaper all over the starch and then let dry
- Repeat this procedure until you have 3 layers.
- Once the newspaper is completely dry you can use a pin to pop the balloons.
- Decorate using the seeds and glue.
- Paint it with the gold paint.
- Tie lace onto the match
- Put the match inside the ornament to be the hanger.
- Tie the ornament onto the Christmas tree.
Perfect Holiday Guide Related Articles
Make Your Own Christmas Cards
If you are on a real tight budget this Christmas or just love to be crafty during the holidays here are some wonderful homemade Christmas card ideas for you to try this holiday season.
Potato Stamp Cards:
- Supplies you may need for your homemade Christmas Cards:
- Paper Bags or Craft Paper
- Potatoes or Sponges
- Paint or colored ink
- Ribbons
- Hole Punch
- Ink Pen
- Paring Knife (adult supervision)
- Plastic Plate
- Scissors
Step #1 - Check to see if you can find any left over envelopes. You can look in old Christmas card boxes or the drawer where mom or dad pays the bills (ask first). If you find any unused envelopes you can use them and you will need to be sure that the cards you make will fit inside these cards.
Step #2 - Measure the envelope (if you didn't find any have mom or dad buy some for you).
Step #3 - Cut out the brown paper bag to be the same height as the card but twice as wide as the card.
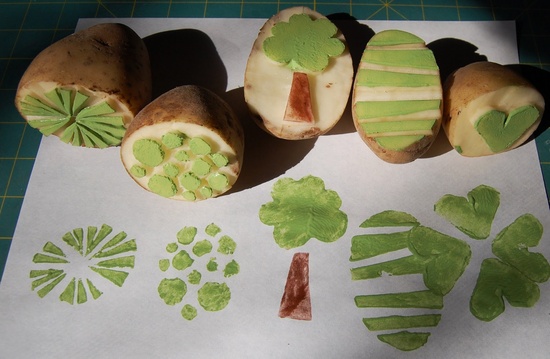
Step #4 - Cut the potatoe in half with an adult helping.
Cut out a Christmas tree shape on the exposed side of the potato (white not the skin).
Cut away potato from the outer edge of the tree that surrounds the tree. You can use three potatoes to cut out different sizes of trees.
Step #5 - Put the paint or ink onto the plastic plate
Dip the Potato Tree into the paint or ink, now place it on what will be the front of your card (one tree or you can make a group of trees).
Step #6 - Make two holes with the hole punch about a centimeter apart below the Christmas tree.
Step #7 - Insert one end of the ribbon through the left hole, and then put it through the other hole. Loop each end around back and through the opposite hole. Now, pull the ribbon out the front of the card. Tie the ribbon into a pretty Christmas bow.
Step #8 - Use the scissors to trim the ribbon.
You can stamp more trees on the inside or write a holiday greeting.
You can also place Christmas stickers on the card or place crayon ornaments on the trees.
You can also decorate the envelopes too.
Use the sponge instead of the potato or buy stamps in the store.
Easy Construction Paper Cards:
Every child knows how to make Christmas cards out of construction paper. You just fold a piece of construction paper in half. Decorate the one outside half like the front of a Christmas greeting card and write a greeting on the inside of the card. Use Christmas colors (green, red, purple). Use Christmas stickers to decorate the cards if you wish.
Left Over Christmas Cards:
If your family saves old Christmas cards ask if you can use them to make new cards.
You will need:
- the old Christmas cards
- construction paper
- glue
- pen, crayons or markers,
- scissors to make these homemade cards.
Sort through the pile of old Christmas cards to find the front of your homemade card. Once you find one you like, cut the front off the old card. You can use parts and not the entire front if you like. You can also use more than one old card to make a different picture.
- Fold the construction paper in half
- Glue the old card picture onto the front of your construction paper card.
- Using the pen, crayons or marker add to the picture, or draw new pictures to go with the old card picture.
- Write a holiday greeting on the inside of the card with your pen. You can copy greetings from the old cards.
Perfect Holiday Guide Related Articles